Intro #
I really like having this static website and being able to host it for free through gitlab pages. This does come with downsides though, a static website does not have a backend server behind it so serving up some things, like a contact form, can’t be processed without sending that data somewhere. The same goes for incorporating a comment system which I touched on briefly in a recent post setting up an internal website.
When I first set up this site, I thought about just making my email address exposed for anyone to see, but then I run risk of getting spam mail. I also saw some more advanced configurations of setting up my own serverless backend.
Personally I opted for a simpler solution which is where HeroTofu comes in.
HeroTofu #
HeroTofu allows for me to set up a web form that they process and send to me. It is fairly easy to get set up. Once your account is created, they have a Forms Library that has some example forms already built. Best of all, there is a generous free tier that covers simple personal sites like this.
I opted for using HeroTofu because the ease of integrating it into my site, and I didn’t want to do something more advanced for something I’d only get a handful of responses from.
I’ll walk through how I created my contact form in a few minutes.
Creating a Form Endpoint #
First let’s create an endpoint to send your web form data to:
-
After creating an account, on the dashboard click
Formsand thenNew Form
-
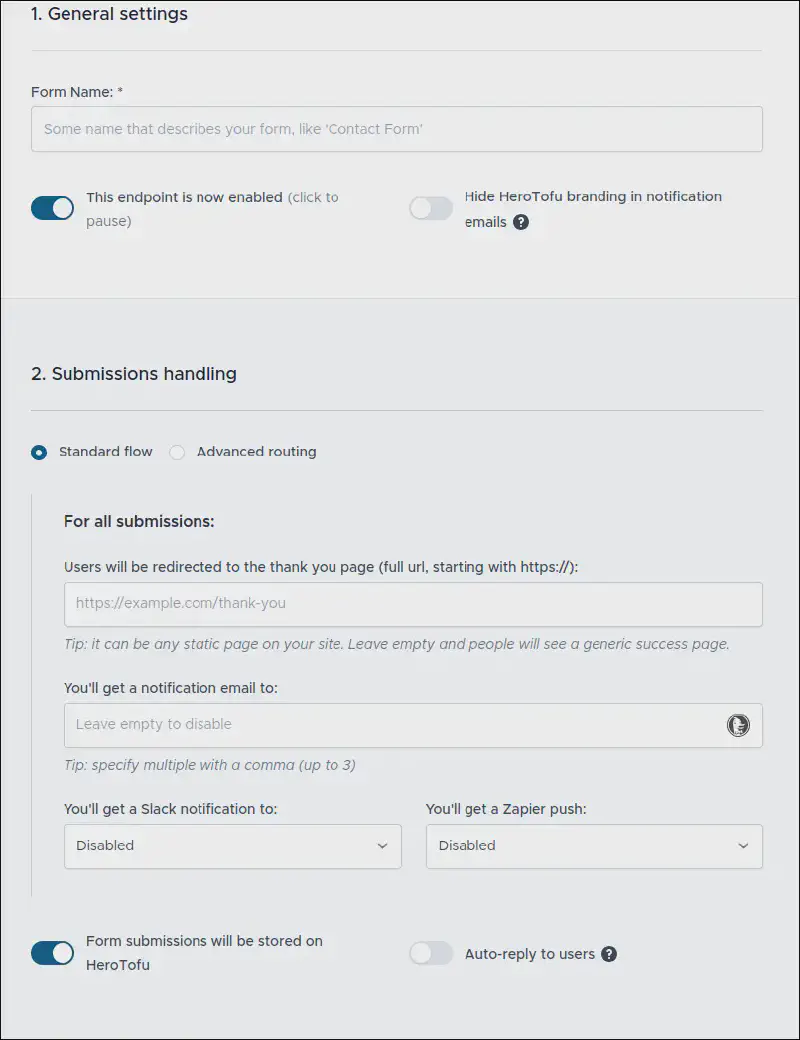
Give the web form a name and then under
Users will be redirected to the thank you pageyou can specify a page users end up on after completing the contact form. If you leave this blank then they will end up at a generic HeroTofu success page. Your email will also be listed as a notification email. -
Next, take a look at the
Spam Protectionsite.
-
I recommend selecting to use captcha on at least suspicious submissions, if not all submissions. Additionally select the
Advanced spam handlingtoggle and take a look at the honeypot information. You may want to use that and will need to know how it works when building the actual form. -
Click
Save.
Create and Integrate Web Form into your site #
Now that the endpoint is created, let’s create a Web Form and integrate it into your site:
-
Go to your site and create an HTML page.
-
If you are using a static site generator that uses markdown files to create the HTML pages, then you will need a way to insert raw HTML into your page.
-
This site is built with Hugo. For Hugo, I made a
/layouts/shortcodes/rawhtml.htmlfile containing simply:{{.Inner}} -
Then I called that shortcode via
{{< rawhtml >}}, placed any HTML text, and then closed the shortcode with{{< /rawhtml >}}.
-
-
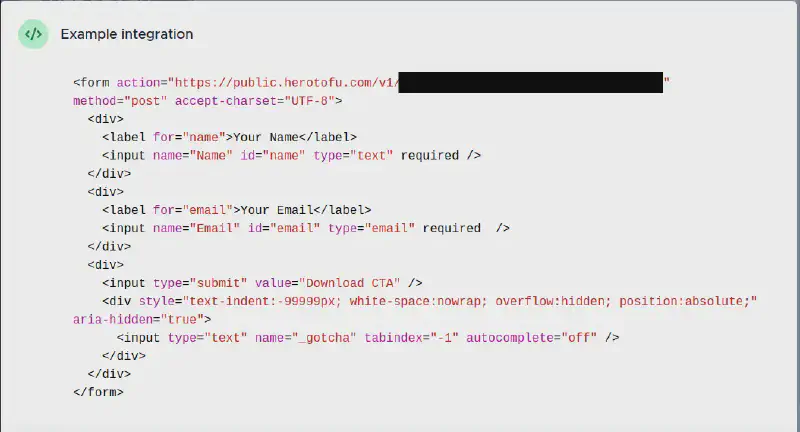
Go back to HeroTofu and find your Web Form Endpoint. Click
Edit->Example Code.
-
At the top of the example, copy the
<form action= [...]>section, and then paste this at the top of your form’s page. -
Make sure to add a closing
</form>at the end of the form if your editor doesn’t do this automatically. -
Now to populate the actual web form. Check out HeroTofu’s forms library and select a form to start off with as your template.
-
Click on your selected form. You will be brought to a page that shows the HTML code. You can also choose the CSS framework you are using and a light/dark theme.
-
Copy the form’s HTML content and insert it between the opening
<form>and closing</form>tags on your page. -
You can now customize the form to your liking if you want to modify the styling, or if you want to use the honeypot by adding in another field to the form (if you need the information again, on HeroTofu edit your endpoint and scroll down to the
Spam Protectionsection to look at theAdvanced spam handlinginfo.)
Conclusion #
Your web form is now built and should render properly on your page. Your static site can now send the form data to HeroTofu who handles the spam protection and forwards the response to your email. I personally have used HeroTofu for this site’s contact form but you can also use it for other web forms like registration forms, sales leads, RSVPs, questionnaires, and more.
