
Intro #
With my switch from Windows to Linux I wanted to also move away from iTunes which I had been using to manage my music library for the past 20 years. In that time I had amassed many playlists, ratings, and play counts that I wanted to retain.
Here were some of my initial problems:
- I needed to extract my playlists from the iTunes library.
- I learned that to prevent corrupting music files, play counts are tracked outside of the music files themselves meaning that I will need to still be able to match play counts from iTunes’ library to a new platform.
- I needed to pick a new platform to start using.
Moreover, the most important thing of this entire project was that the song filepaths were the unique identifier for that song. This was the only reliable identification piece stored in iTunes library and it needed to be retained throughout the process (most notably when using tagging software later on)
Navidrome #
I chose Navidrome as the new permanent home for my music for a few reasons:
- self-hostable
- free and open source
- can listen and track plays across devices (has a decent web player, and supports a subsonic API)
- I personally liked the feel of Navidrome more than some self-hostable alternatives.
- I also liked that there was a database (my comfort zone) that I could update to track existing plays, and upon inspecting the database I found the players could be tracked across songs, artists and albums.
The downsides to Navidrome for me were:
-
The web UI is more album centric and I tend to prefer artist-centric. This was a minor nitpick as Navidrome still did everything I needed, and with the subsonic API I could use a 3rd party client if I wanted.
Navidrome’s Web UI Navigation -
When I first launched Navidrome, my library had a lot of inconsistencies in how things were displayed because I did not have my songs properly ’tagged’ (more on that later).
Navidrome showed a lot of promise though if I cleaned up my library. I mistakenly thought I needed to wait to use it until I cleaned up my library and so I thought I needed a temporary home to listen to music until I had time to cleanup my library. I’d later find out that Navidrome is very capable of managing changes, so long as you don’t change tags AND the file location at the same time. This meant I could’ve just switched to Navidrome to begin with…hindsight.
Migration to Rhythmbox #
For a new temporary home, I selected Rhythmbox in part because of it’s inspiration from iTunes which included how the database is stored. I also wanted to utilize something that was open source which Rhythmbox is.
I’ll detail the steps I took migrating from iTunes to Rhythmbox first.
Explore .xml differences between iTunes and Rhythmbox
#
To begin this migration, I needed to extract an .xml file from itunes which I was able to do within iTunes by selecting File -> Export Library.
Once I had the .xml file from iTunes I compared it to the .xml file from Rhythmbox (which auto-generated when I started Rhythmbox)
Looking at the two files I found some differences:
-
Difference in
Locationkey for new home directory(itunes) <key>Location</key><string>file://localhost/C:/Users/SomeUser/Music/iTunes/iTunes%20Media/Music/SomeArtist/SomeSong.mp3</string> (rhythmbox) <key>Location</key><string>file:///home/SomeUser/Music/SomeArtist/SomeSong.mp3</string>This was a simple matter of doing a find/replace to get the filepaths to match. I also took the time to go through my Music folder and consolidate the files. Over 20 years of using iTunes they had thrown media into different subfolders so I moved everything into the base
~/Music/folder and then did another find/replace to remove folder paths likeiTunes/iTunes Media/andiTunes/iTunes Music/ -
There were some issues with with non-sluggified names:
(itunes)
      /Some%20&%20Artist/

(rhythmbox)
    /Some%20&%20Artist/
For the issues with non-sluggified names I ended up writing a script to sluggify my music subfolders and files, and then update the iTunes
.xmlfilepaths. Unfortunately I slowly worked on this project over several months and I didn’t save the scripts I wrote for these steps. The script essentially iterated through the itunes.xmlfile, found the filepaths, sluggified them, and then also found the song at the old location and moved it to the new sluggified location.Note that if you do not sluggify, some symbols like
&are handled differently iniTunes Music Library.xmlandrhythmbox.xmlso you’d need to find/replace those differences so that the file paths between both.xmlfiles are the same (again, file paths are the primary identifiers throughout this project) -
Ratings were on different scales:
(itunes)
<key>Rating</key><integer>100</integer>

(rhythmbox)
<rating>5</rating>
This was easy enough to handle in my conversion script, but it was just something to be aware of.
Migrate iTunes Music Library.xml to Rhythmbox
#
For the next part I wrote script to go through rhythmbox.xml and lookup values from iTunes Music Library.xml, matching on file location which is what I had specifically cleaned. Once a match was found it updated the corresponding values for plays, ratings, and last-played.
python xml-transfer.py "iTunes Music Library.xml" "rhythmbox.xml" -v --dry-run
xml-transfer.pycan be found here.
This script has a few parameters including a --dry-run which let me test the matching and review logs before committing changes.
The dry-run of the transfer script worked well and then I ran it again to make the actual changes. Upon putting the updated Rhythmbox .xml file in the proper location, I was able to see all of my plays, ratings, and last-played in Rhythmbox!
Extracting Playlists from iTunes #
The next part was to get my iTunes playlists which I had learned previously while exploring my 370,000 line iTunes .xml file that the playlists are stored in the .xml as well.
Within it I found a Playlist ID key
      <key>Playlist ID</key><integer>49201</integer>
      <key>Parent Persistent ID</key><string>8F39F0FBFA11A635B</string>
      <key>Playlist Persistent ID</key><string>7A4E1D647AD44F2G</string>
      <key>All Items</key><true/>
      <key>Name</key><string>Most Played</string>
And then inside of the playlist I found the Playlist Items key:
  <key>Playlist Items</key>
      <array>
        <dict>
          <key>Track ID</key><integer>3886</integer>
        </dict>
        ...
        </dict>
      </array>
This confirmed my playlists were contained in the .xml file, but that it was too large for me to do this manually so I would have to approach it programmatically.
Fortunately before I sat down to write my own parsing script, I found a python script here.
I downloaded the script and gave it a try. The script supports several parameters so I was able to specify:
- my
.xmllocation as the--library-path - my desired
--output-dir - a
--track-path-prefixwhich was needed since I opted to put my extracted playlists into a nested folder so a relative filepath was needed.
python itunes_xml_to_m3u.py --library-path="~/Music/iTunes/iTunes Music Library.xml" --output-dir="~/Music/playlists/" --track-path-prefix="../"
This worked as expected and I now had all my playlists in ~/Music/playlists, with each .m3u8 playlist using relative filepaths to expect music filepath to be in ~/Music
From here, if I wanted the playlists accessible in Rhythmbox then I could follow these instructions to import them.
Tagging music: Beets, Picard, and kid3 #
This next part is what took me the most time, as I wanted to get my music properly tagged which essentially is the file meta-data and it can be used to link songs, artists, and albums to MusicBrainz to identify it, as well as give other useful information like the year it was released, which specific release it was, etc.
I used three different programs to do my music tagging, each for slightly different purposes. This isn’t meant to be a full comparison, just what I found worked for me:
beets #
I started with using beets to do a full sweep of my entire ~/Music/ directory. Beets is a command-line application that is really powerful in automatically sweeping a specified folder for audio files and then automatically assigning tags if it has a high degree of confidence in what album it is. If it isn’t confident, it will prompt you to make some choices where you can pick one of the suggested albums, enter an ID that you looked up on MusicBrainz, or some other options.
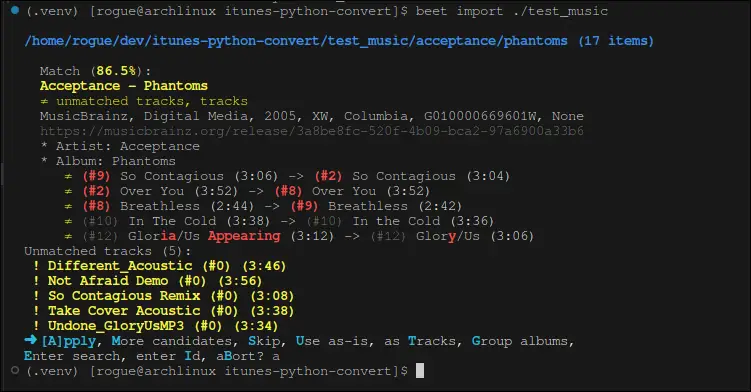
Beets overall worked well for me, though by default it does want to move music into its own desired folder structure. Recall that for this project we’re using filepaths as the identifiers so using the copy argument -C is essential to ensure our songs are left in-place and the song identifier (filepath) is not changed.
I had some issues running beets over my large library, I imagine this was partially or fully user error, but if the script was interrupted it was not properly picking up where it left off like beets intends to do. To resolve this, I created a script to generate a csv of every top-level filepath in my music folder.
python generate-folder-csv.py
generate-folder-csv.pycan be found here
Then I created a separate script to iterate through that csv and run beets on one folder at a time, marking the filepath as completed in the csv as it progressed.
python beets-import-with-csv.py
beets-import-with-csv.pycan be found here
This allowed me to iterate through my ~500 subdirectories without losing progress.
After the first pass through with beets, I did still need to do some cleaning up. Beets didn’t recognize all of my music, or I might’ve had a release spread out across multiple folders so I needed to make sure that the songs in each folder were added to the same specific release ID as opposed to two different versions of the same release. This is where kid3 and Picard came in.
MusicBrainz Picard #
I used Picard to go through my albums and pick up anything that was missed. At this point I was loading my music into Navidrome (without my iTunes data) and I could see that some albums were being listed twice due to the issue mentioned above with inconsistent tags within a single release. With Picard I was able to load up an album and ensure all the songs were tied to the same release and then Navidrome would correctly display them under one album instead of 2+.
Picard did a better job than beets identifying music that were in ‘clusters’ like this, but it did still struggle with cases where I might’ve had 3 copies of an album each with their own exclusive track, but I really just wanted 1 master copy with the main album + exclusive tracks. it could technically handle it, but I found kid3 made these edge cases easier.
kid3 (KDE) #
I used kid3 for some quick changes, like needing to copy all (or most) of a song’s tags over to another song. This allowed me to easily force some exclusive songs into another album release version. I also found kid3 useful in overriding album art, because some releases from musicbrainz had the wrong album art or just in poor quality. Kid3 made these changes quick and easy.
Migration to Navidrome #
At this point I have already set up Navidrome and was viewing my music in it, just without the iTunes data like my play counts or ratings.
As I mentioned earlier, in hindsight I could’ve just started with Navidrome from the beginning because as long as you don’t change the filepaths and the tags in the same Navidrome library scan, Navidrome can handle the changes and keep the songs correctly identified with their play data/ratings/etc. This meant I could’ve technically just used Navidrome with dirty tags, and it still would’ve been able to track my plays during this interim period because I was never updating my song’s filepaths.
So instead of having an itunes to Navidrome migration script, I created a Rhythmbox to Navidrome migration script. And to make matters worse, I am ashamed to admit that I had some filepath issues I didn’t catch initially and only updated them in my ~/dev/itunes-migration/rhythmdb.xml rather than the actual .xml file Rhythmbox was using during this interim period. What this meant was that I had two rhythmdb.xml files:
- one that was most up to date with filepaths that I was using for my project
- another that had my most up-to-date play statistics/ratings that Rhythmbox was using
So I was forced to choose between my unique identifiers (filepaths) or newer play statistics/ratings. I chose my unique identifiers, and with this decision that meant I could’ve just migrated from iTunes to Navidrome to begin with since, despite my best efforts, I still ’lost’ a few months of play counts.
Ashamed and bruised, I wrote my migration script Rhythmbox to Navidrome. I tackled this project in two parts:
- explore the
navidrome.dband map out relations torhythmbox.xml - write the script to migrate to
navidrome.db
Schema Exploration #
For The schema exploration I used DBeaver as a free SQL client and loaded in the navidrome.db.
I found some basic info: the media_file table has the non-user specific data about a music file. For my purposes this meant:
path- the filepath to musicid- unique key for the songartist_id- unique key for the artistalbum_id- unique key for the album
I then found the music’s user specific data stored in the annotation table with the following data:
user_id- (a unique id per user)item_id- an id formedia_file,album, orartistitem_type-media_file,album, orartistplay_countplay_dateratingstarredstarred at
When a play count was recorded, Navidrome created or updated three entries in this annotation table: one for media_file, album, and artist. Meaning instead of just tracking plays or ratings per song, Navidrome tracks it by all three of these. This was really neat once I finished the migration to see my play counts by artist, not just by song!
I had already looked through the rhythmbox.xml initially for the migration to rhythym box, but looking at it again for this migration:
<?xml version='1.0' encoding='utf-8'?>
<rhythmdb version="2.0">
  <entry type="song">
    <title>SomeSong</title>
    <artist>SomeArtist</artist>
    <album>SomeAlbum</album>
    <track-number>8</track-number>
    <duration>238</duration>
    <file-size>6069272</file-size>
    <location>file:///home/someUser/Music/some_artist/some_album/08_some_song.mp3</location>
    <mtime>1246363986</mtime>
    <first-seen>1285516451</first-seen>
    <last-seen>1742602402</last-seen>
    <bitrate>192</bitrate>
    <date>733408</date>
    <media-type>audio/mpeg</media-type>
    <composer>Unknown</composer>
    <rating>3</rating>
    <play-count>3</play-count>
    <last-played>1282757541</last-played>
  </entry>
And some fields can be missing, like the rating if the song was never rated.
Writing the Script #
Next I planned my script and loosely followed this logic:
- load
navidrome.db - iterate through
media_file.idand set variables for the following columns:id= the song identifier for the databasepath= the filepath and only common identifier between Navidrome and Rhythmbox so it is our primary key for matchingartist_id= theidof theartistalbum_id=idof thealbum- Note: You could also iterate through the
.xmlinstead of through the.db. I opted to iterate through the.dbbecause when Navidrome initialized it already ingested all of my music into themedia_filetable. Meaning every file should have a match.
- Look through
rhythmbox.xmland find the match between thepathand alocationtag. - After a match is found, find the
.xmlentry’srating,play-count,last-playedand set as variables.- If a key was missing, defaulted to
0forratingandplay-count, andNULLforlast_played. last-playedalso was converted from UNIX timestamp to Navidrome’s format2025-06-25 13:45:30.665+00:00.
- If a key was missing, defaulted to
- Query
annotation.item_idequal to ouridand whereannotation.item_tpe==media_file.- Note: since I was the only user in my database at this time, I did not need to also include checking logic for the
annotation.user_idto make sure I wasn’t updating another user’s annotations. - If match is found:
- Increment
annotation.play_countbyplay-count, if any - set
annotation.rating=rating(can transfer as is sincerhythmbox.xmland Navidrome both on a scale of 1-5. If you were transferring from iTunes directly to Navidrome then you’d need to convert the itunes rating to a scale of 1-5 instead of 0-100) - Update
annotation.play_dateif it is older thanlast-played.
- Increment
- If a match is not found in
annotationtable then a newannotationrecord was inserted:annotation.user_id= (the unique user_id for my login)annotation.item_id= theidof the type of record you’re looking upannotation.item_type=media_fileannotation.play_count=play-countannotation.play_date=last-playedannotation.rating=rating
- Note: since I was the only user in my database at this time, I did not need to also include checking logic for the
- Repeat step 5 for the
artistandalbum. Essentially for eachmedia_filewe are updating or inserting a record for themedia_fileitself, theartist, and thealbum. Meaning:- Query
annotation.item_id==artist_id, and whereannotation.item_type==artist - Query
annotation.item_id==album_id, and whereannotation.item_type==album - Then update or insert a record appropriately for that
annotation.item_type.
- Query
- Once the
media_file,artist_id, andalbum_idhave been updated or inserted, reset variables and continue to loop throughmedia_filetable
Running the script #
Next, I backed up the database and ran the script.
python navidrome-import.py navidrome.db rhythmdb.xml NAVIDROMEUSERID /home/someUser/Music
navidrome-import.pycan be found here.
I included some basic logging so when I ran the script I found:
Music Migration Log - 2025-06-27 11:04:19

✓ MATCH: an_artist/some_album/09_some_song.mp3
  Plays: 10, Rating: 4, Last played: 1502418395

✓ MATCH: an_artist/some_album/02_some_song.mp3
  Plays: 1, Rating: 4, Last played: 1502416915

✓ MATCH: an_artist/some_album/05_some_song.mp3
  Plays: 5, Rating: 4, Last played: 1502417505

[...]

--------------------------------------------------------------------------------
MIGRATION SUMMARY
Total files processed: 8049
Files matched with Rhythmbox data: 8028
Match rate: 99.7%
The entries that were not matched were logged as well:
✗ NO MATCH: another_artist/some_other_album/12_some_song.mp3
Reviewing these files, my earlier sluggify script had added handled some .. in the filename unexpectedly, so I manually fixed the 21 filenames, reverted to my backup database and ran the script again:
MIGRATION SUMMARY
Total files processed: 8049
Files matched with Rhythmbox data: 8049
Match rate: 100.0%
Success!
Playlists #
If you’re following along you might’ve noticed I didn’t touch playlists in my schema exploration or script.
Earlier, I used a script to extract my playlists from the iTunes Music Library.xml as .m3u8 files. Navidrome by default picks up these playlists automatically so this is why I did not add them through my migration script. Instead:
-
I allowed Navidrome to automatically ingest the playlists when it first scanned my library.
-
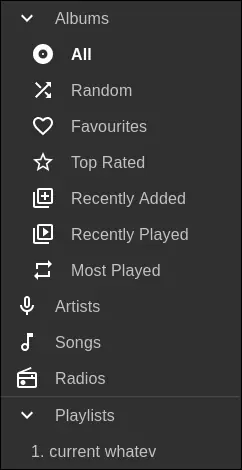
In Navidrome, I navigated to the
Playlistspage and turned off theAuto Importfor each playlist. I did this to ensure that as I made changes to the playlist in Navidrome that it didn’t try to ever re-read these initial.m3u8playlist files.
Navidrome’s playlist settings showing the auto-import toggle -
I then updated my Navidrome configuration option
ND_AUTOIMPORTPLAYLISTStofalse.
With this, all of my playlists were accessible in Navidrome and can now be updated in Navidrome as I see fit.
Phone App: Symfonium #
The final piece in this project was finding an app to use on my phone. I originally tested: Substreamer and Symfonium. Both of these apps supported the subsonic API that Navidrome uses.
For Substreamer I liked that it was free, but:
- It appears it isn’t open source nor actively maintained
- I noticed it took a few seconds to start playing a new song
- I was unable to get most of my playlists loaded. They would get loaded with 0 files, or if they showed files in the playlist, when i went to play it still wouldn’t play 50% of the time.
For Symfonium the only downside I found was that it isn’t open source and does cost money to use. While I prefer supporting open-source projects and donating to them, this app is really well done:
- Felt super snappy when loading new songs
- Great and customizable UI
- Playlist are synchronized and updates are sent to Navidrome and vice-versa. There are different options on how playlist synchronization should work which is also a nice option.
- Allows setting rules to cache files on your device automatically. So I can set rules to auto cache my favorite artists music, as well as auto-cache any of my favorite playlists. As I add songs to those playlists, the new songs are automatically cached.
- If plays are tracked while not connected to Navidrome, it stores the plays locally and updates them when next connected.
If I had to do it again (lessons learned): #
I hinted at it a few times, but the biggest takeaway for me if I had to do this all over again I would have migrated directly from iTunes to Navidrome. I mistakenly thought that it would be cleaner if I tagged my music first, then switched to Navidrome. Since I was not updating file locations though, Navidrome’s library scans could’ve handled tracking updated tags without losing any annotations (plays/ratings/etc).
I also would’ve made sure I was updating the rhythmbox.xml that Rhythmbox was using, since I had accidentally started updating my project copy. As I mentioned earlier, this ended up with me losing a few months of play statistics/ratings and ironically the whole reason I was using Rhythmbox as a temporary solution was to avoid that exact thing! In the end this wasn’t a huge loss, just a healthy dose of irony 🙂
Conclusion #
If you’re made it this far, thanks for following along. My final results are now that:
- Navidrome is being hosted on my local network
- I have all ~8k songs loaded into Navidrome with the past 20 years of play counts, ratings, and playlists retained
- I am able to listen to my music within my home network, or on my phone via Symfonium (which syncs with the Navidrome server when connected to the home wifi)
This has been a huge success– for the first time I can track my plays between my computer AND my phone. I’m able to seamlessly use my current library on my phone without having to worry about manually copying files to my phone or updating my playlists on my phone manually and then make the same changes on my computer. These may sound like small things but removing these friction points has made listening to music more enjoyable. For instance I was able to buy an album and once I dropped the files in my music folder, I instantly had access to it on my computer and phone. All of these things have made Navidrome not just a replacement for iTunes, but an upgrade in every way.