Intro #
Immich is a high performance self-hosted photo and video management solution that can be used as a replacement for Google Photos, iCloud Photos, etc. Recently I wanted to give Immich a try, and decided to host it on my Synology NAS to make it easy to add external libraries directly from my NAS.
⚠️ This isn’t intended to replace the project’s documentation. Instead it will cover the Synology related components. Please ensure you have read and understood the project documentation, disclaimers, and requirements.
Prepare #
-
Review the requirements. Note the required RAM and compare it to your NAS. If you are needing additional RAM, then I previously upgraded mine after reading this guide.
-
In Synology Package Center, download ‘Container Manager’ if you don’t have it already.
-
In File Station, find your volume and create a docker folder if one does not exist. Then create an
immich-appfolder, and two subdirectories:postgres,library(these are referenced in the.envfile and the build will not complete if these are missing).Your folder structure should look like this:
/volume1/docker/
└── immich-app
    |── library
    └── postgres
Update Config Files #
- On your local machine, download
docker-compose.ymlandexample.envwhich can be found in the docker-compose installation instructions.
docker-compose.yml #
-
Open
docker-compose.yml -
If you want to add external libraries from your NAS to Immich, we will need to make them accessible to your immich-server. Find the following section and add in and update with your file paths:
services:
  immich-server:
    volumes:
      # Do not edit the next line. If you want to change the media storage location on your system, edit the value of UPLOAD_LOCATION in the .env file
      - ${UPLOAD_LOCATION}:/usr/src/app/upload
      - /etc/localtime:/etc/localtime:ro
+     # Add NAS pictures and videos folders to use as External Libraries
+     - "/volume1/path/to/your/pictures:/usr/src/app/library/pictures"
+     - "/volume1/path/to/your/videos:/usr/src/app/library/videos"
Note: In Docker volume bindings (path:path), the left side is your NAS’s file path, and the right side is where that folder will appear inside the Docker container. For example, /volume1/photos:/photos means your NAS folder /volume1/photos will be accessible as /photos inside the container.
-
As of writing, Synology’s Container Manager doesn’t support
start_interval, which is a docker healthcheck parameter that defines how frequently the health check runs during the container. We will need to remove this otherwise the build will fail. Find the parameter and comment it out as shown below:services: database: healthcheck: - start_interval: 30s + # start_interval: 30s
.env #
-
Rename
example.envto.envand then open it. -
Follow documentation to update .env.
Upload config files #
- In Synology File Picker, upload the
docker-compose.ymland.envfiles to your immich-app folder./volume1/docker/ └── immich-app ├── docker-compose.yml ├── .env |── library └── postgres
Create Project and Build #
-
In Synology’s Container Manager, Go to Project -> Create.
-
Project Name:
immich-app -
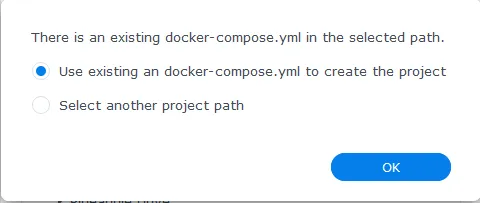
Path: click set path and navigate to your /volume1/docker/immich-app/ folder. Click Select. A popup will ask to use the existing docker-compose.yml. Use the existing file and click OK.

-
Click through the next few screens, leaving the default settings. When you get to the Summary page click “Done”.
-
A terminal window will pop-up showing the status of the build. It may take a minute but should complete successfully.
-
To verify it completed successfully, in the Container Manager under Projects you should now see the immich-app with a green status icon. Similarly if you go to Containers you will see several immich containers with green status icons.
Accessing Immich and Adding External Libraries #
-
Follow the Post Install Steps. You will need to know your NAS IP. If you don’t know your IP, in Synology, click on the widgets button in the top right corner. A System Health card will show your LAN1 IP address. So for example, if your LAN1 IP was 192.0.0.2 then you would navigate to “192.0.0.2:2283” to access Immich.
-
Review the External Libraries documentation.
-
Once you’ve created an admin user, click on your user icon and then click on “Administration”
-
Click External Libraries -> Create Library.
-
A New library will appear. Click on the dots to rename it. And then click on the dots to “Edit Import Paths”.
-
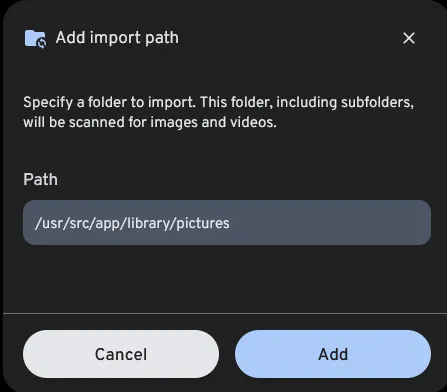
Then click on “Add Path” and add in the paths from our
docker-compose.yml. Remember the right side of the bindings is where the docker container has access to the files, so from our example you should add:/usr/src/app/library/pictures/usr/src/app/library/videos

-
Once you’ve added all paths, click “Save”.
-
Next under “Jobs” you should see immich starting to collect your media and generating thumbnails/etc.
Updating Immich #
You will want to keep Immich up-to-date to ensure compatibility. When a new version is released, be sure to:
-
Read the release notes for any breaking changes to be aware of
-
Review the
docker-compose.ymlto see if any changes were made to the formatting -
Backup the database by copying the
postgresfolder in your Immich directory. This location is specified byDB_DATA_LOCATIONin your.envfile. If you’ve been following along:/volume1/docker/ └── immich-app └── postgres
To update Immich via Container Manager:
- Go to Container Manager →
Project - Select your
immich-appproject and click:
Stop(wait for containers to stop)Action→Clean(removes the containers)
- Go to the
Imagesection and remove the docker images for immich - Return to
Projectsection - Select
immich-app→Action→Build
The latest images will be built and when the server launches you’ll be on the latest release.
Conclusion #
You should now have a fully functioning Immich instance running on your Synology NAS, with access to both uploaded photos and your existing NAS photo libraries. Immich provides a powerful, self-hosted alternative to cloud photo services, giving you full control over your media while maintaining many of the features you’d expect from services like Google Photos.
Remember to regularly check the official Immich documentation for updates and new features. You can manage your Immich containers through Synology’s Container Manager, including viewing logs and updating to newer versions as they become available.
